Step 1 making the blog
If you want to make your own click on the link below
http://www.blogger.com
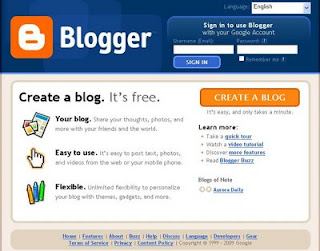
and you should see this.

Click the big orange create a blog button and follow the steps.
It's that easy.
You will need an email address and a password. You will also need a name for your blog.
When you get to the naming stage you'll need to check if the name you want is available or taken, it may take several goes to get one that's free. (Don't worry It won't affect what you call your blog in it's title.)
If you are a Heretaunga kindergarten and you want one that looks like this one, in the Heretaunga style, you can either
a) play around and work it out your self.
or
b) email me for the script we use and instructions on how to paste it in once you've set it up.
or
c) easier once set up go to settings tab, permissions link and then invite Hunter Park by email to contribute to the blog and once we accept give us admin privileges and I'll do it for you.
or
d)easiest email me at Hunter Park to set you up a blog and I'll set it up and invite you in and then make you admin.
Step 2 Get your settings right.
You will want to click the settings tab and go to "settings" tab and go to comments, select always moderate comments and make sure you save your settings.
You will then want to go to permissions and select who can see your blog and invite other people you want to contribute to it. Once again save your settings.
You may also wish to adjust formatting to give the correct time zone (and then save your settings)
And also check your settings under basic, for instance you should have the no button selected under adult content.
Step 3 Start posting.
You do this by clicking new post, under the "Posting" tab.
(If you're in a Heretaunga style blog you'll probably have to click the button that says "blogger" on the right hand side of your blog site to get there.)
Then you simply type, check what you've typed and click publish post (orange button button left you made need to scroll down.)
Remember to click "view blog" tab to see what it looks like.
Made a mistake? Hit the back arrow (top left of browser window) and click edit post. Fix the mistake and then press "publish post" button again.
A useful button is the abc tick button, this is a spell check.
Step 4 pictures
Make sure you have permissions to put them up, or use no identifiable pictures (backs of heads etc). make sure they are appropriate.
Next in my pictures (or were ever you store them) right click on the picture you want to put up, select open with then follow the arrow to select microsoft office picture manager.
The picture pops up with a toolbar, click edit pictures on this tool bar.
The edit pictures tools should now appear, first crop if needed then select compress pictures.
Select compress pictures for web pages and press okay.
Then go to file and select save as (if you click save your original will be altered which you often don't want.) Name the photo web and a name eg "web sandpit 1" the web part helps you find it easily later as they'll all be together, usually at the end of your file.
Then alter other pictures next to it, using the left right arrows at the bottom or close picture manager. It will ask you if you want to save changes, again tell it no, unless you want your original changed.
(We make pictures smaller because they take a lot less time to upload and use less of the bandwidth you've been allocated by blogger. Plus it makes them harder to misuse.)
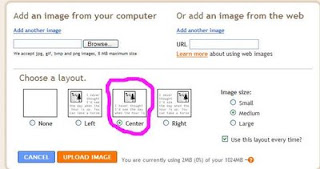
In your new post on blogger select the add image button (top of the post looks like a small picture of a mountain, hover your pointer over it it'll say "add image" while you're at it hover over the other buttons.) This window below pops up.
Click browse and navigate to were you saved your picture named "web..."
Important click center (circled in pink here) under choose layout, otherwise words and pictures get all messed up in placement and can be a pain.
Then click upload image and when the done button comes up, click done.

You can thendrag your picture around.
Tip the first picture you upload will be at the bottom to start with, the last at the top.
Step 5 Explore further and trouble shooting.
When you've had a chance to get your head around things click the layout tab and click "add a gadget" this is how you add links, pictures, and notes to the side of your page. They can be moved around, just remember to save them.
You may notice when posting the "edit html" tab at times this is useful, like when occasionally your writing appears blue and underlined. If this happens change to "edit html" you'll likely see a greater than sign followed by "/a" , next to a less than sign followed by an "a" click between these and hit enter to add some line breaks. Start to type in the gap and then change back to compose tab again.
Once you get to recognise which lines of HTML refer to your picture you can also copy and paste those lines around in edit html mode to move your picture.
Html script is what the computer sees, with all the instructions on what to do like, what font size to use, what colour the words should be, etc. Compose is what you see with the html removed. The computer automatically adds any html you need.
Occasionally the computer tells you it can't publish because of a problem with the html. Just make sure you've entered a title and click the blue "save now" button next to "publish post" then find someone to help you or save then try and fix it yourself.
David


2 comments:
Information was just what I was looking for. Maria and Serena are keen to set up a blog for Irongate, but are playing round and trialing personal and closed blogs initially. Would love to know how much time is involoved maintaining your kgtn blog. Many thanks, wish us luck on our blog journey...
Having trouble creating a slideshow gadget, how do I upload the photo's I want to show? Any suggestions? P.S. Never used HTML!! Can u help. thanks. Your blog is amazing... our guinea pig blog is progressing nicely..C u all on Sept. 4 for my ob day. x
Post a Comment